How To Grow Microgreens at Home in 7–14 Days
Leah mixed a fresh chop with Micropod microgreens and served it in the Easy-Tray. Prep took under 2 minutes. Sunny and Pip stayed focused on the tray, sampling greens without fuss. You can grow, harvest and plate it this simply on a windowsill.
Safe for most birds: Many vegetable microgreens are excellent for parrots and budgies as part of a varied diet.
⚠️ AVOID these varieties: Avocado microgreens, onion or garlic types, nightshade foliage (tomato, pepper leaves)
Always: Rinse before serving and consult an avian vet if unsure about new varieties.
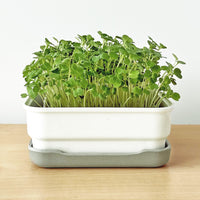
What are microgreens?
Microgreens are young edible seedlings harvested after the cotyledons and first true leaves appear. Most common varieties are ready to cut in 7–14 days. They are not sprouts. Sprouts grow and are eaten seed-and-root in high humidity. Microgreens are grown with light and airflow, then cut above the mat or medium.

What you need
Essential Equipment
- Micropod tray with grow mats
- Clean water for bottom-watering
- Scissors or Micropod Micro Snips
- Small Easy-Tray or Large Easy-Tray for serving
Seeds & Quantities
- 1-2 teaspoons seeds per standard tray
- Beginner-friendly varieties: Radish (fastest), sunflower, broccoli
- Mixed varieties or single-type plantings

Days 1-3: Germination Phase
🌱 Prep, sow, and blackout period. Most seeds show white shoots by day 3.
Days 4-7: Growth Phase
🌿 Move to light, begin bottom-watering. Cotyledons open and green up.
Days 7-14: Harvest Window
✂️ Ready when first true leaves appear beyond cotyledons, plants 1-2 inches tall.
Step-by-step: sow to harvest in 7–14 days
- Prep the tray: Place a mat in the Micropod tray and pre-moisten evenly. Mat should be damp throughout but not dripping.
- Seed evenly: Sprinkle 1-2 teaspoons in a dense, even layer. Aim for full coverage without big clumps.
- Blackout 2–3 days: Cover completely to encourage upright growth. Keep moist, not wet. Check daily for sprouting.
- Light and airflow: Move to a bright windowsill when most seeds sprout. Gentle airflow helps sturdy stems.
- Bottom-water only: Add water to the base so foliage stays dry. Never water from above once plants emerge.
- Grow to first true leaves: Usually day 7–14 depending on variety and temperature. Harvest when first true leaves appear beyond cotyledons.
- Harvest and serve: Snip above the mat with Micropod Micro Snips, then portion straight into the Easy-Tray with your chop. Store extras in the fridge for 5–7 days.

Easy-Tray: fast plating with chop and microgreens
Use the Easy-Tray to portion chop + fresh microgreens fast. The shallow tray suits small servings, lets birds sample variety and rinses clean in seconds.
- ✅ Portion control for small birds
- ✅ Works with wet chop or dry toppers
- ✅ Swap trays for quick refills
- ✅ Rinses clean in seconds
Serving tip: Start with a teaspoon of microgreens and increase gradually. Remove leftovers daily.

FAQs
Young edible seedlings cut above the mat at the cotyledon to first true leaf stage. Most home trays are ready in 7–14 days.
Commonly 7–14 days depending on variety, temperature and light. Radish is fastest (5-7 days), followed by mustard and cress. Sunflower and broccoli follow at 7-10 days.
Bright indirect light on a windowsill is fine. Grow lights help in winter or very low light rooms.
Too much surface moisture and poor airflow. Bottom-water, thin your seeding rate and add gentle airflow.
Most do not regrow well. Reseeding gives the best results. Pea shoots can sometimes regrow once.
Yes! The Micropod system uses grow mats instead of soil, making it clean and mess-free. Perfect for indoor growing.
Many vegetable microgreens are fine in moderation as part of a varied diet. Avoid avocado, onion or garlic types and nightshade foliage. Rinse before serving and consult an avian vet if unsure.